Install VCT Tile day 3
Yay now comes the FUN!!
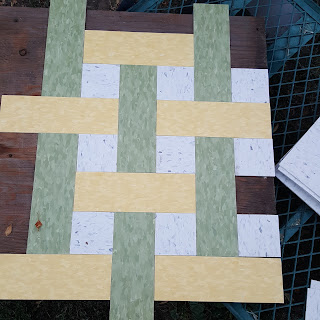
 Originally I was going to lay the tile with the yellow going the length of trailer but the I realized the green made the trailer look smaller so I switched the yellow and green.
Here you can see what I'm talking about the darker color leading into trailer is not as inviting also.
For those interested here are the Armstrong tiles I used
Little Apple Green 51866, Lemon Yellow 51812, Polar White 51941
This Pattern is called a basket weave.
It looks complicated but its really simple
 So I did a dry layout. (I know this photo you can see adhesive I didn't take a photo of dry run) You can see I didn't center in door because it was such a small space and in the end the tile on the left I has to cut down only ¼" and I also will have a doormat there so I left it. Now if it was going to be really noticeable I would have centered pattern.
 Now to apply the adhesive with a small notched trowel. LET DRY completely it will be see through If it isn't completely dry the adhesive will oozed between tiles and make even a bigger mess plus tiles will slide around. I used a fan not only to cool me off but to speed up process. It was around 110 degrees in trailer. Remember I left the tiles in the sun so they are more pliable and its easier to get them to butt up next to each other.
You can start to see how simple the pattern is. I installed all of the whole tiles then went around the edges to figure out each individual cut.
REMEMBER there is a grain in tiles if 1 tile
is off it will drive your eyes insane plus look like shit. Its those little squares you must pay attention to!
 Here you can see the adhesive on tiles and how a few of them moved on me this is where I should have kneeled on a board. So to clean this up use mineral spirits. Normally you are supposed to use a heavy roller to set tiles. I didn't do that. I let floor sit for a day or so then I walked all over it. I also didn't wax after I finished Lesson learned WAX FLOOR BEFORE TRACKING IN MUD!!!!!!


 Originally I was going to lay the tile with the yellow going the length of trailer but the I realized the green made the trailer look smaller so I switched the yellow and green.
Here you can see what I'm talking about the darker color leading into trailer is not as inviting also.
For those interested here are the Armstrong tiles I used
Little Apple Green 51866, Lemon Yellow 51812, Polar White 51941
This Pattern is called a basket weave.
It looks complicated but its really simple
 So I did a dry layout. (I know this photo you can see adhesive I didn't take a photo of dry run) You can see I didn't center in door because it was such a small space and in the end the tile on the left I has to cut down only ¼" and I also will have a doormat there so I left it. Now if it was going to be really noticeable I would have centered pattern.
 Now to apply the adhesive with a small notched trowel. LET DRY completely it will be see through If it isn't completely dry the adhesive will oozed between tiles and make even a bigger mess plus tiles will slide around. I used a fan not only to cool me off but to speed up process. It was around 110 degrees in trailer. Remember I left the tiles in the sun so they are more pliable and its easier to get them to butt up next to each other.
Tip: get a board to sit or kneel on that way you won't shift tiles. I wish I would have thought about this during job. Even tho the adhesive is dry it isn't cured so you can still pry up and move tiles around. I had to get my 5 way out quite a few times to readjust tiles. Now I know I'm supposed to work from the back out towards door but That was too much brain work for me and I didn't want to apply adhesive in small area let dry apply again let dry lay tile. Fuck that it would have taken a few more days so I worked into the trailer and installed it all in a few hrs.
 |
| I placed tile under threshold of door you can see what adhesive should look like when dry. |
You can start to see how simple the pattern is. I installed all of the whole tiles then went around the edges to figure out each individual cut.
REMEMBER there is a grain in tiles if 1 tile
is off it will drive your eyes insane plus look like shit. Its those little squares you must pay attention to!
 Here you can see the adhesive on tiles and how a few of them moved on me this is where I should have kneeled on a board. So to clean this up use mineral spirits. Normally you are supposed to use a heavy roller to set tiles. I didn't do that. I let floor sit for a day or so then I walked all over it. I also didn't wax after I finished Lesson learned WAX FLOOR BEFORE TRACKING IN MUD!!!!!!
 |
Here you can see the dry layout. If the lines are off here it would look like shit!
|


 |
| I see those spaces they drive me insane but I will chalk it up to this being my 1st basket weave floor. |


Comments
Post a Comment